


Setting Up a Sitecore MCP Server with XP and VS Code Copilot (Step-by-Step Guide)
What is MCP?
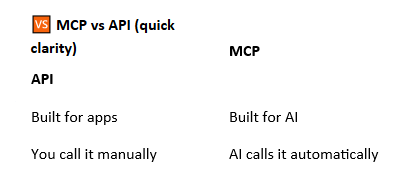
MCP (Model Context Protocol) is a way for AI tools—like GitHub Copilot—to securely connect to external systems (like CMSs, APIs, databases) and use real, live data while generating responses.
In simple terms
MCP is a bridge between AI and your systems.
Instead of the AI guessing or relying only on training data, MCP lets it:
- Query real APIs
- Fetch live data
- Perform structured operations
The Sitecore Marketer MCP Server is changing the game for how developers and marketers interact with content, moving us closer to the era of the “Prompt-Driven CMS.”
It allows you to use natural language in AI tools (like Claude, Cursor, Copilot) to manage Sitecore XM Cloud content, such as creating pages, updating components, or managing assets. It acts as a translator between AI agents and the Sitecore Agent API to perform actions securely.
Here is a breakdown of why this matters, who it benefits, and real-world use cases.
Who is this useful for?
- Developers & Architects: Connect your IDE directly to your Sitecore instance to write perfect, schema-aware GraphQL queries instantly.
- Marketers & Content Authors: Reduce reliance on manual UI navigation. Launch campaigns and organize assets via natural language prompts.
- Business Users: You no longer need deep knowledge of the Sitecore content tree or page builder interfaces to get Content management things done.
- Platform Admins: Maintain strict security. MCP enforces existing Sitecore Identity permissions, ensuring the AI only interacts with authorized tenant-level data.
Real-World Use Cases
- Empowering Non-Technical Stakeholders: This is perhaps the biggest win. A business user with zero background in Sitecore’s architecture can simply prompt an AI with, “Create a new promotional page for the summer campaign using our standard layout,” and the MCP server translates that natural language into the correct backend page creation and component assembly.
- AI-Powered Chatbots: When building custom conversational interfaces for XM Cloud, MCP allows the LLM to query your live content architecture to answer user questions accurately.
- Automated Migrations: Moving from legacy XP to XM Cloud? Developers can use MCP-connected agents to automate the heavy lifting of converting old MVC components into dynamic headless layouts.
- Prompt-Driven Campaign Execution: Marketers can use a single prompt to automatically create pages, generate localized content, and organize assets natively.
Integrating AI into your Sitecore workflow is no longer experimental—it’s quickly becoming a practical advantage. By setting up a Model Context Protocol (MCP) server, you can enable GitHub Copilot inside Visual Studio Code to directly interact with your Sitecore Experience Platform environment.
This guide walks you through a streamlined, real-world setup based on a working approach, so you can get Copilot querying Sitecore content in minutes.
What Is the Goal?
The objective is simple:
Allow Copilot Chat to query and understand Sitecore content using an MCP server.
Instead of manually hitting APIs or digging through Sitecore, you can ask:
- “Get item by path /sitecore/content/Home”
- “List children of Home item”
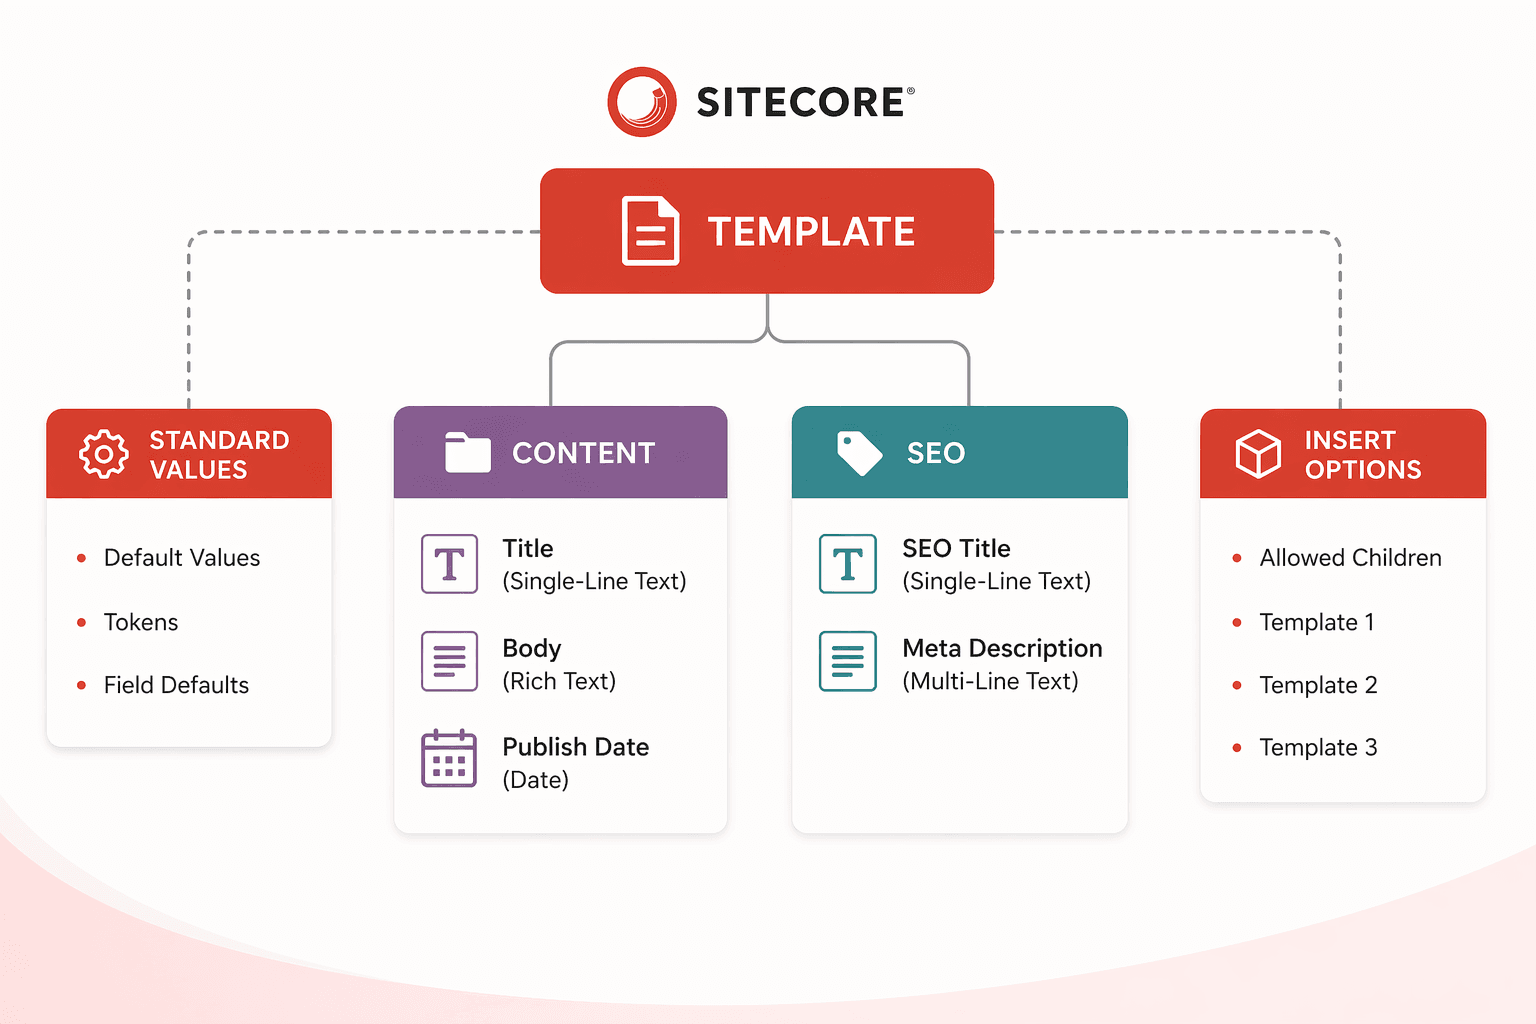
- “Show fields for this template”
And get structured responses instantly.
Prerequisites
Future-Proof Your Sitecore with AI-Driven Workflows
Before you begin, make sure your environment is ready:
1. Sitecore Setup
- Sitecore 10.x installed (e.g., XP 10.4)
- Instance running locally or remotely
2. API Configuration
- GraphQL endpoint enabled (/sitecore/api/graph/edge or similar)
- Item API (SSC) enabled if needed
- Valid API key configured
3. Development Tools
- Node.js installed
- npx available
4. VS Code Extensions
Install:
- GitHub Copilot
- GitHub Copilot Chat
Step 1: Create MCP Configuration
Inside your project root, create the following file:
.vscode/mcp.json
This file tells VS Code how to spin up and connect to your MCP server.
Step 2: Add Sitecore MCP Server Definition
Add a server configuration inside mcp.json.
Example:
{
  "servers": {
    "sitecore-local": {
      "command": "npx",
      "args": [
        "sitecore-mcp-server",
        "--endpoint",
        "https://your-sitecore-instance/sitecore/api/graph/edge",
        "--apiKey",
        "YOUR_API_KEY"
      ]
    }
  }
}
What to update:
- Replace endpoint with your Sitecore GraphQL URL
- Replace YOUR_API_KEY with your actual API key
- Add credentials if required (depending on your setup)
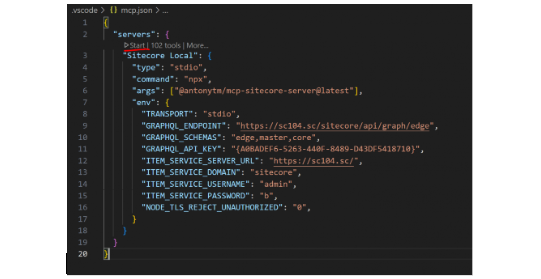
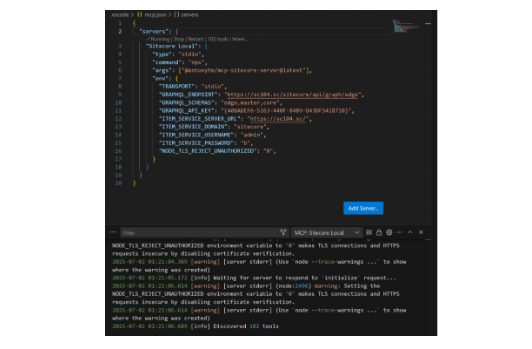
{
  "servers": {
    "Sitecore Local": {
      "type": "stdio",
      "command": "npx",
      "args": ["@antonytm/mcp-sitecore-server@latest"],
      "env": {
        "TRANSPORT": "stdio",
        "GRAPHQL_ENDPOINT": "https://sc104sc.dev.local/sitecore/api/graph/edge",
        "GRAPHQL_SCHEMAS": "edge,master,core",
        "GRAPHQL_API_KEY": "YOUR_API_KEY",
        "ITEM_SERVICE_SERVER_URL": "https://sc104sc.dev.local",
        "ITEM_SERVICE_DOMAIN": "sitecore",
        "ITEM_SERVICE_USERNAME": "",
        "ITEM_SERVICE_PASSWORD": ""
      }
    }
  }
}- Update the values to match those for your Sitecore instance
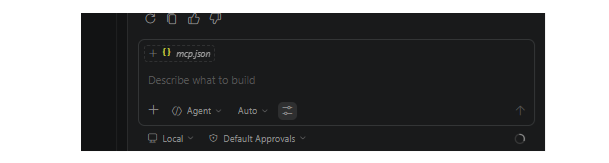
- Open up the MCP file you’ve configured above and click ‘start’:
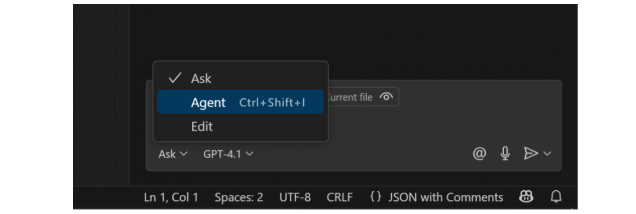
- Open Co-Pilot in VSCode and Switch CoPilot to ‘Agent’ mode like so:
- Click on the tool icon at the bottom like so:
- Scroll down the list that pops up and you should see your new MCP Server registration showing up like so with some commands available:
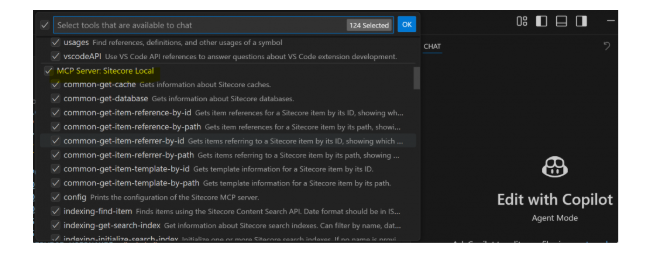
If you don’t see this then try restarting VSCode and try opening CoPilot and clicking the tool icon again or try restarting the MCP server in your console.
- You can monitor the MCP server response in the output window in VSCode:
- Now we can test it’s working.
Test the MCP Server works
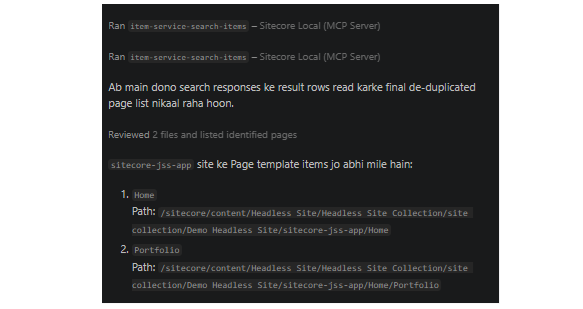
1. Ask CoPilot to test the connection by typing something like: ‘provide the list of all pages of site– Your-Site-Name ‘ and Click continue to run the command and test it.
If it worked You should see something like this:
Step 3: Launch the MCP Server
Once configured:
- Open VS Code
- Open Command Palette (Ctrl + Shift + P)
- Run:
- MCP: List Servers
- Select your server (sitecore-local)
- Start the server from the UI
Step 4: Enable Copilot Agent Mode
Now connect Copilot:
- Open Copilot Chat
- Enable Agent mode
- Select your MCP server (sitecore-local)
At this point, Copilot is connected to your Sitecore environment.
Step 5: Test the Connection
Try a simple query inside Copilot Chat:
Get item by path /sitecore/content/Home
If everything is configured correctly, Copilot will:
- Call the MCP server
- Query Sitecore GraphQL
- Return structured item data
Troubleshooting Common Issues
1. SSL Errors (Self-Signed Certificates)
If you’re running Sitecore locally with HTTPS:
NODE_TLS_REJECT_UNAUTHORIZED=0
This disables SSL verification (use only for local development).
2. MCP Server Not Found
- Run:
- MCP: List Servers
- Ensure your mcp.json file is in .vscode/
- Restart VS Code if needed
3. API Not Responding
- Verify GraphQL endpoint works in browser/Postman
- Check API key validity
- Confirm Sitecore instance is running
Why This Matters
This setup unlocks a new development workflow:
Without MCP
- Manual API calls
- Context switching
- Guesswork in code generation
With MCP + Copilot
- Natural language queries
- Real-time content access
- Smarter code suggestions
Copilot is no longer guessing—it’s working with your actual Sitecore data.
What You Can Do Next
Once your MCP server is working, you can extend it further:
- Add custom endpoints for templates and components
- Generate TypeScript types from Sitecore templates
- Build AI-powered content search
- Automate component scaffolding
Final Thoughts
Setting up a Sitecore MCP server is a small investment with a big payoff. It bridges the gap between traditional CMS development and modern AI-assisted workflows.
By connecting Sitecore XP, VS Code, and GitHub Copilot, you create a development environment where content, code, and AI work together seamlessly.
And this is just the beginning—once MCP becomes part of your workflow, you’ll start thinking about Sitecore not just as a CMS, but as a programmable knowledge system.
Happy Coding !